
슬롯 작업 요청
- 봇 흐름 및 자연어 이해(NLU) 기능을 사용하는 데 필요한 모든 Architect 권한 . 자세한 내용은 다음을 참조하세요. 건축가 권한 개요 .
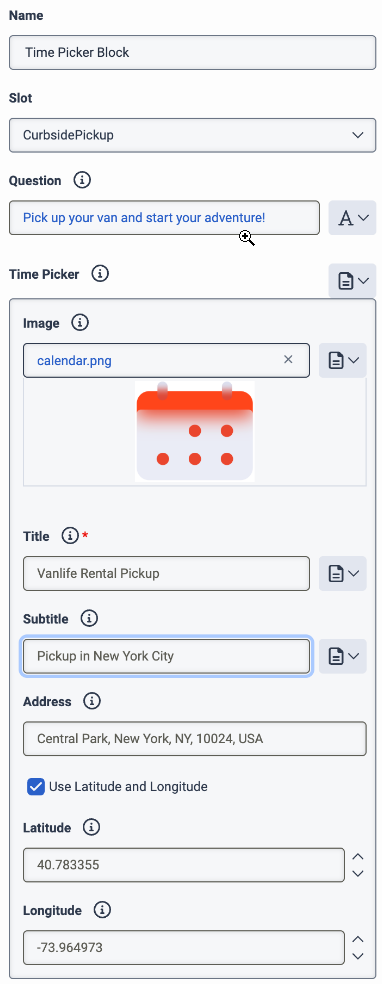
- 다음은 시간 선택기를 구성할 때 지리적 위치 정보를 가져오기 위한 권한입니다.
- 지리적 위치 > 지오코딩 > 술책
슬롯 요청 작업은 발신자 또는 채팅 수신자가 발언에서 언급한 슬롯을 식별합니다. 예를 들어 "내 계좌 번호는 12345678입니다." The bot identifies that the participant’s account number has a value of 12345678.
Architect 도구 상자에 있는 봇 흐름의 Ask 메뉴에서 이 작업에 액세스합니다.
동적 목록 유형의 경우 표현식을 사용하여 슬롯 값 표시를 지정할 수도 있습니다. 예를 들어:
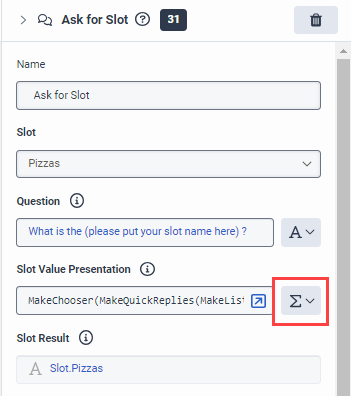
MakeChooser(MakeQuickReplies(MakeList(MakePostbackChoice("pepperoni"), MakePostbackChoice("ham"), MakePostbackChoice("mushroom"))))
동적 슬롯이 있는 경우 디지털 봇 흐름을 업데이트하고 다시 게시해야 합니다.
| 이름 | 설명 |
|---|---|
| 이름 필드 | 작업의 고유한 이름을 입력합니다. 여기에 입력하는 레이블은 흐름 구조에 표시되는 작업의 이름이 됩니다. |
| 슬롯 |
미리 구성된 슬롯을 선택하세요. 선택한 슬롯 유형에 따라 프레젠테이션 템플릿은 슬롯 값 프레젠테이션 또는 시간 선택기로 전환됩니다. 슬롯은 자연어 이해 창에서 구성됩니다. 자세한 내용은 다음을 참조하세요. 슬롯과 슬롯 유형 이해 . |
| 질문 |
슬롯을 요청할 때 봇이 생성하는 통신입니다. |
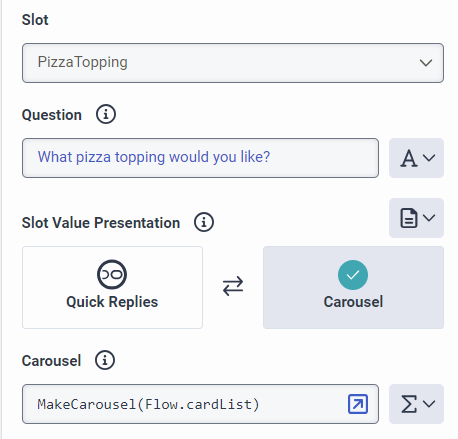
| 슬롯 값 프레젠테이션 |
목록 선택기 : 사용자가 선택할 수 있는 항목 목록을 만들어 보내려면 이 옵션을 선택하세요. 예를 들어, 사용자가 주문 목록에서 하나 이상의 주문 ID를 선택할 수 있도록 목록 선택기를 보낼 수 있습니다. |
|
빠른 답장: 사용자가 다음에 수행할 작업을 나타내는 단추를 만들려면 이 옵션을 선택합니다. 예를 들어, 호텔 방을 예약하거나, 호텔 이벤트 센터에 연락하거나, 식사 시간을 듣습니다. |
|
|
캐러셀: 이미지, 제목 또는 설명이 있는 카드를 만들고 사용자에게 향상된 시각적 경험을 제공하려면 이 옵션을 선택합니다. |
|
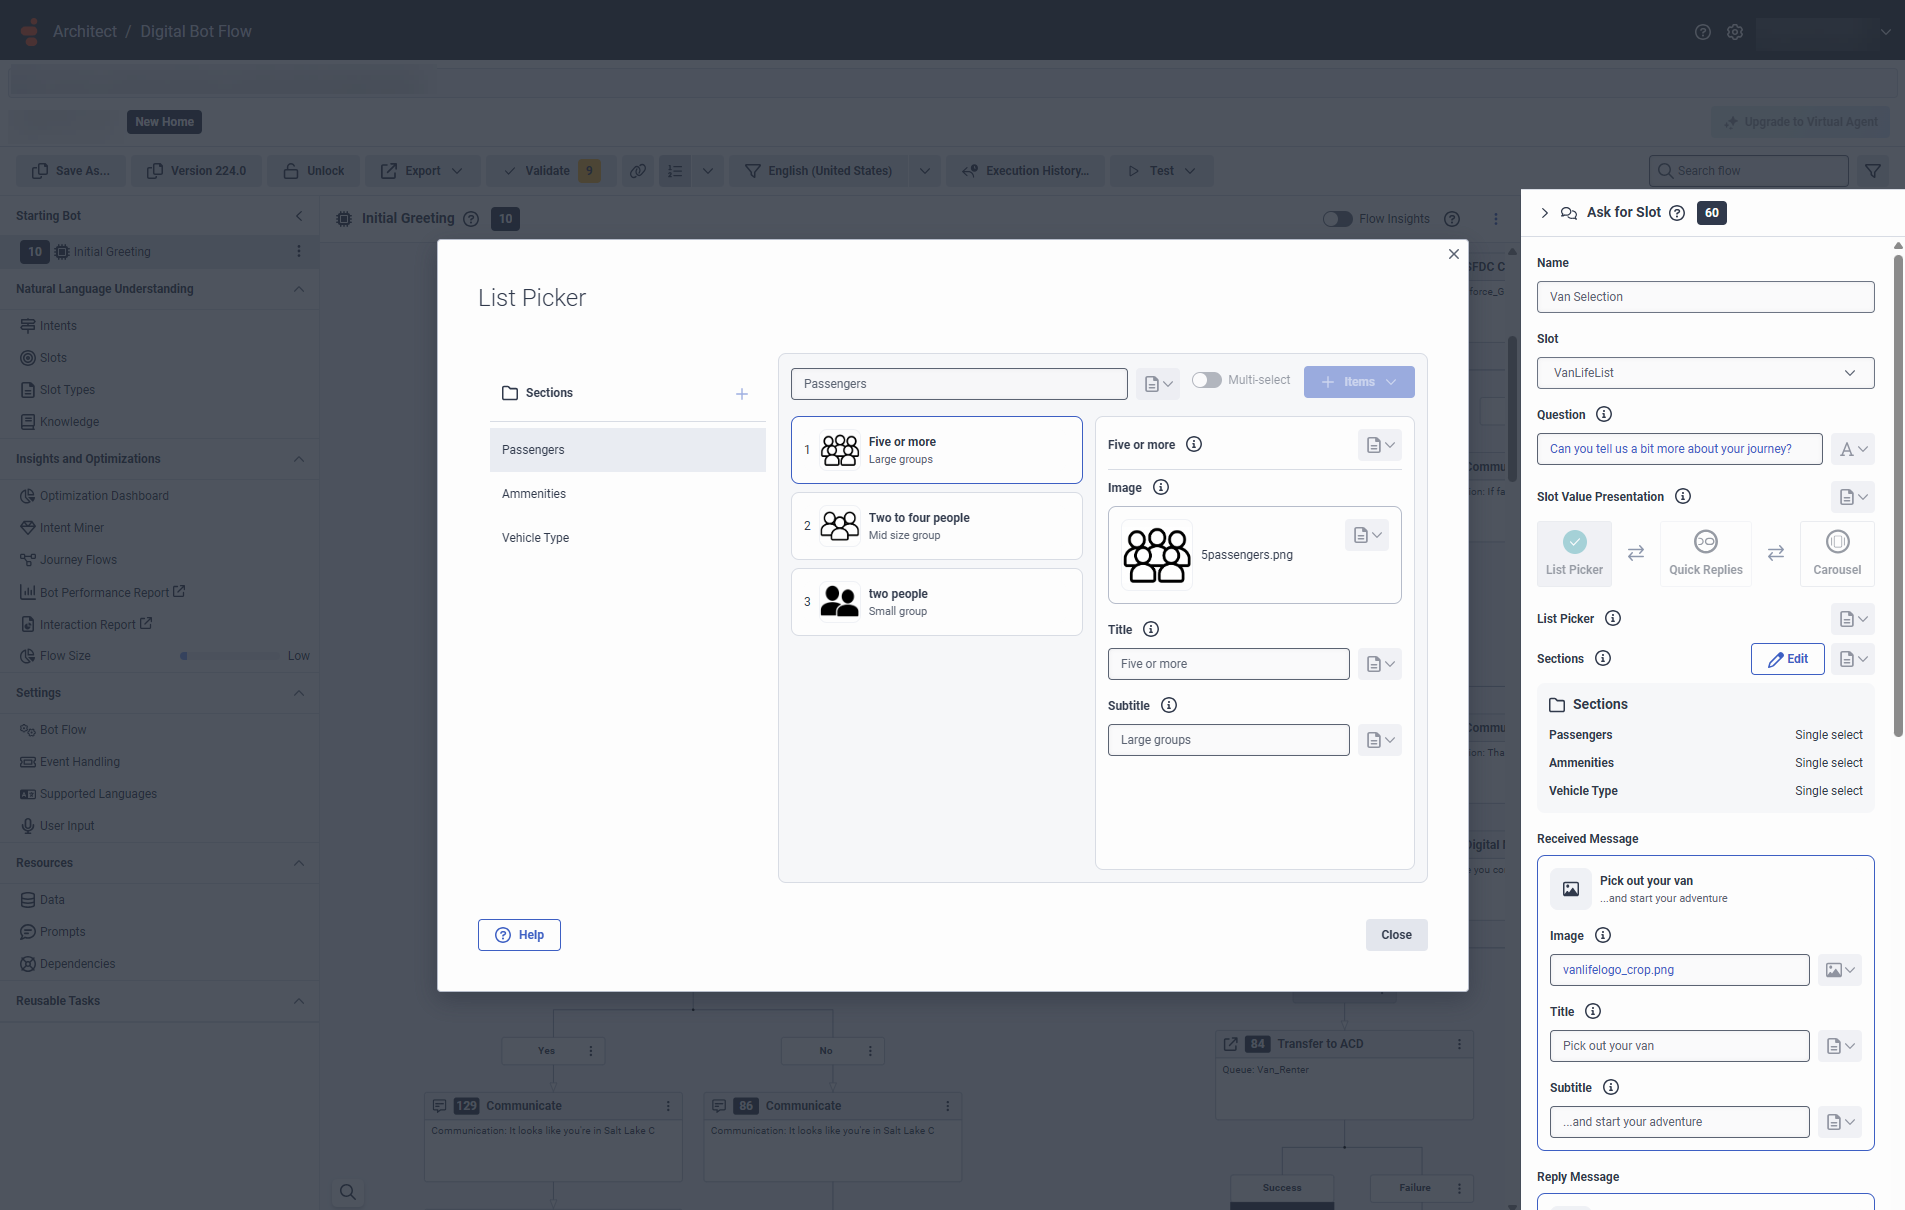
| 목록 선택기 |
슬롯 요청 작업에서 목록 선택기를 사용하고 슬롯을 선택하면 Architect는 선택한 슬롯에 구성된 항목 목록으로 섹션(기본값)을 채웁니다. 사용자의 필요에 맞게 각 섹션에 섹션을 추가하거나, 섹션을 제거하고, 항목 목록을 사용자 정의할 수 있습니다. 목록 선택기를 구성하려면 다음 단계를 수행하세요.
메모:
|
| 빠른 답장 |
슬롯 요청 작업에서 빠른 회신을 사용하고 슬롯을 선택하면 Architect가 빠른 회신을 자동으로 채워줍니다. 빠른 회신 카드에서는 표현식을 사용하여 버튼 유형, 값, 레이블을 지정할 수 있습니다. 예를 들어:
참고:
|
| 회전 목마 |
회전형 컬렉션에는 카드당 최소 1개, 최대 3개의 아이템이 있어야 하며, 회전형당 카드는 10개입니다. Genesys는 최적의 시각적 효과를 위해 800 x 400픽셀 또는 이와 유사한 이미지를 사용할 것을 권장합니다. 캐러셀 카드를 추가할 때 표현식을 사용하여 이미지, 카드 제목, 카드 설명을 추가할 수 있습니다. 예를 들어:
|
| 시간 선택기 |
시간 선택기를 추가하면 이미지, 제목, 부제, 위치를 추가할 수 있습니다.
참고:
|
| 슬롯 결과 |
고객이 선택한 값을 저장하는 변수입니다. 고객이 선택하지 않으면 값이 지정된 값 없음으로 유지됩니다. |
| 사용자 지정 유효성 검사 |
이 부울 표현식을 사용하면 더 많은 검증 논리를 구성할 수 있습니다. 흐름은 런타임에 표현식을 평가할 때 이를 사용하여 수신된 값이 이러한 추가 요구 사항을 충족하는지 확인합니다. 표현식이 false 또는 NOT_SET 부울로 평가되면 해당 값은 잘못된 것으로 간주됩니다. |
| 연속 프롬프트 |
AI 기반 슬롯이 일부만 수집될 때 봇이 생성하는 커뮤니케이션으로, 사용자에게 추가 입력을 제공하도록 촉구합니다. |
| 프롬프트 |
사용자로부터 일부 입력을 받았을 때 봇이 생성하는 커뮤니케이션을 입력합니다. 메모 : 특수 문자(예: AI 기반 슬롯)를 캡처하는 봇 흐름에 대해 슬롯 요청 작업을 구성할 때 |
| 연속 프롬프트 사용자 정의 |
연속 프롬프트 필드를 활성화하고 연속 프롬프트 목록을 만들 수 있습니다. 봇은 부분적인 입력 이벤트를 받은 후 점진적으로 이러한 프롬프트를 반환합니다. 메모 : 최대 10개의 프롬프트를 연속 재메시지에서 구성할 수 있습니다. |
| 입력 없음 |
봇이 사용자 입력을 수신하지 않을 때 생성하는 통신을 입력합니다. 메모: 디지털 봇 흐름에서는 입력 재요청이 활성화되지 않습니다. 봇은 사용자가 정의한 구성을 반환합니다. 설정 > 사용자 입력 > 입력이 감지되지 않았습니다 > 입력 없음 사과 질문 커뮤니케이션과 결합됨. |
| 입력 없음 사용자 정의 |
Enables the No Input Reprompts field and enables you to create a list of no input prompts that the bot incrementally returns after it receives no user input. |
| 입력 재촉 없음 |
After the bot receives No Input, it returns the communication at the position in the No Input Reprompts collection that corresponds to the current number of No Inputs received for that action. For example, the first No Input triggers the bot to use the first No Input reprompt in the defined collection. The length of the No Input Reprompt collection also overrides the maximum number of No Input retries that you define in Settings > User Input > No Input Detected > Maximum Number of No Input Retries for that particular action. For example, if you define two reprompts in the collection, the bot retries twice. An empty collection turns off No Match retries. 메모 : 봇은 사용자가 설정한 구성을 반환합니다. 설정 > 사용자 입력 > 일치하는 항목이 감지되지 않았습니다 > 매치되지 않은 사과 No Match 커뮤니케이션과 결합됨. |
| 기본 입력 없음 |
Enables the No Input field and allows you to define a single No Input prompt that the bot returns after it receives no input. |
| 일치 항목 없음 |
The communication that the bot returns when the user’s input is not a valid match. 메모 : 봇은 사용자가 설정한 구성을 반환합니다. 설정 > 사용자 입력 > 일치하는 항목이 감지되지 않았습니다 > 매치되지 않은 사과 No Match 커뮤니케이션과 결합됨. |
| 일치하지 않는 사용자 정의 |
Enables the No Match Reprompts field and enables you to create a list of no match prompts. The bot returns these prompts incrementally after it receives No Match input events. |
| 일치 재촉 없음 |
When the bot receives a No Match input, it returns the communication at the position in the No Match Reprompts collection that corresponds to the current number of No Match inputs received for that action. For example, the first No Match input triggers the bot to use the first No Match reprompt in the defined collection. The length of the No Match Reprompt collection also overrides the maximum number of No Match retries that you define in Settings > User Input > No Match Detected > Maximum Number of No Match Retries for that particular action. For example, if you define two reprompts in the collection, the bot retries twice. An empty collection turns off No Match retries. 메모 : 봇은 사용자가 설정한 구성을 반환합니다. 설정 > 사용자 입력 > 일치하는 항목이 감지되지 않았습니다 > 매치되지 않은 사과 No Match 커뮤니케이션과 결합됨. |
| 기본 일치하지 않음 |
Enables the default No Match field and allows you to define a single No Match prompt that the bot returns after it receives No Match input events. |
|
확인 모드 |
This option controls if the bot confirms the slot value supplied by the participant is correct. 런타임 시 이 설정이 "항상"으로 평가되고 참가자가 제공한 값이 '검증' 섹션의 설정에 따라 유효하면 봇은 '확인 질문' 커뮤니케이션을 사용하여 참가자에게 확인합니다.
|
| 경로 |
메모:
|