
작업 계획 탐색
근무 계획 페이지에는 근무 계획을 준수하는 에이전트의 교대 근무 세부 정보가 표시됩니다. 이미지를 클릭하면 확대됩니다.
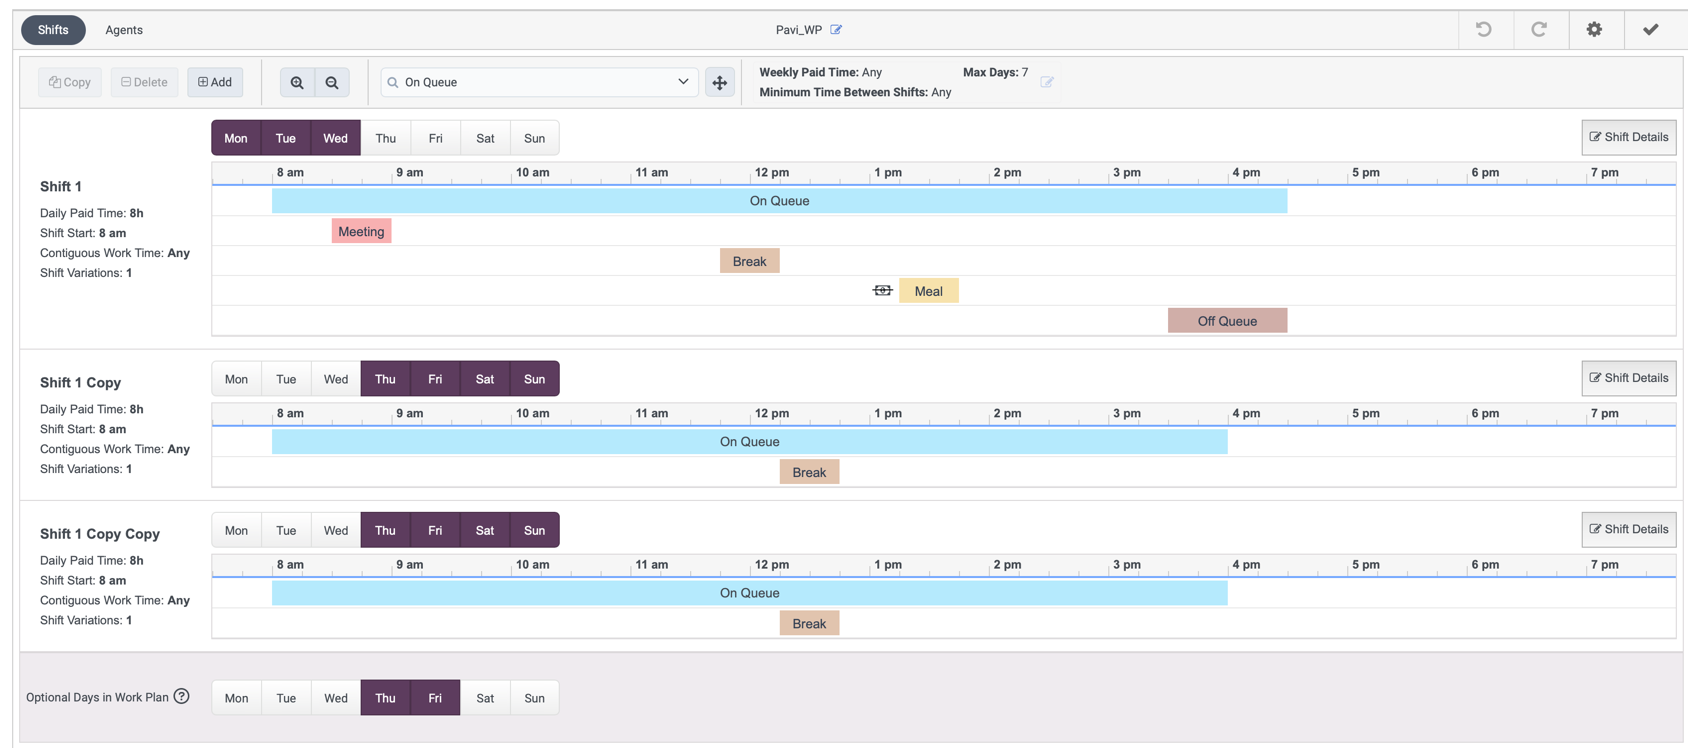
다음 표는 작업 계획 구성 페이지의 교대 보기에 있는 필드와 해당 설명을 나열합니다.
| 필드 | 설명 |
|---|---|
| 교대근무 | 교대 근무를 하려면 이 버튼을 클릭하십시오. 자세한 내용은 작업 계획의 일일 교대 구성. |
| 작업 계획 이름 | 작업 계획의 이름을 나타냅니다. |
| 작업 계획 이름 | 작업 계획의 이름을 추가하거나 업데이트하려면 여기를 클릭하십시오. |
| 확인 및 저장 | 작업 계획을 만들면 Genesys Cloud에서 문제가 있는지 확인합니다. 작업 계획을 저장하기 전에 오류를 해결하세요. 경고 및 정보 알림이 있는 작업 계획을 저장할 수 있습니다. 선택적으로 정보를 클립보드에 복사하여 검토할 수도 있습니다. |
| 교대조 복사, 추가 또는 삭제 |
교대조를 복사, 추가 또는 삭제할 수 있습니다.
|
| 확대 또는 밖으로 |
확대/축소 옵션을 사용하면 교대 보기를 사용자 지정할 수 있습니다.
|
| 교대 활동 설정 |
교대 근무에 활동을 추가하려면:
|
| 매주 유급 시간 |
여기를 클릭하면 작업 계획 세부 정보 편집 대화 상자가 열리고, 여기서 작업 계획의 구성을 설정할 수 있습니다. 자세한 내용은 다음을 참조하세요. 작업 계획의 구성을 설정하세요 . |
| 교대 시작 시간 미리보기 |
근무 시작 시간을 설정하면 당신은 할 수 있습니다 선택적으로 교대 시작 시간의 유연성을 허용합니다. 유연한 시작 시간을 구성하면 아래의 왼쪽 및 오른쪽 화살표를 클릭하여 각 증분 구성된 시작 시간에서 시프트를 미리 볼 수 있습니다. 시프트 미리보기. |
| 교대 근무일 추가 |
일일 교대 근무에 요일을 추가하려면 원하는 각 요일을 클릭합니다. |
| 일일 유급 시간 |
여기를 클릭하여 교대 근무를 구성할 수 있는 교대 편집 대화 상자를 엽니다. |
| 교대조 탐색 |
이 영역에서 다음을 수행할 수 있습니다.
|
| 작업 계획 중 선택 일수 |
스케줄링 엔진은 선택적인 요일을 선택하지 않는 한 선택된 일일 교대조가 두 개 이상 포함된 요일에 대해 정확히 하나의 일일 교대조를 선택합니다. 이 경우 스케줄링 엔진은 일일 교대를 선택할 수 있습니다. 아래에 근무 계획의 선택적 일수, 일정 엔진에서 요일 또는 요일을 클릭하여 해당 날짜의 일일 교대조를 선택하도록 지시합니다. 선택 과목 열. |
작업 계획 페이지의 에이전트 보기에는 선택한 작업 계획에 매핑된 에이전트 목록이 표시됩니다.
다음 표는 작업 계획 구성 페이지의 에이전트 보기에 있는 필드와 해당 설명을 나열합니다.
| 필드 | 설명 |
|---|---|
| 상담원 | 작업 계획에 상담원을 추가하고 관리하려면 이 버튼을 클릭합니다. 자세한 내용은 작업 계획에 상담원 추가. |
| 작업 계획 이름 | 작업 계획의 이름을 나타냅니다. |
| 에이전트에 대한 변경 사항을 취소합니다. | |
| 변경 사항을 다시 실행하세요. | |
| 표시 옵션 대화 상자를 표시합니다. | |
| 작업 계획을 검증하려면 클릭하세요. | |
| 추가하다 | 사용 가능한 에이전트를 선택할 수 있는 에이전트 추가 대화 상자가 표시됩니다. |
| 이름 | 대리인의 이름을 나타냅니다. |
| 미디어 유형 | 에이전트가 처리할 수 있는 미디어 유형을 나타냅니다. |
| 큐 | 상담원이 할당된 대기열을 나타냅니다. |
| 언어 | 에이전트가 아는 언어를 나타냅니다. |
| 기술 | 에이전트의 기술 세트를 나타냅니다. |
| 현재 기본 작업 계획 | 상담원에게 할당된 기본 작업 계획을 표시합니다. 이 설정은 기본 작업 계획 외에 에이전트가 할당될 수 있는 다른 작업 계획을 제외합니다. |